Friday, October 30, 2015

Holding Action (2) - continued.


Union cavalry patrol (top centre) finds a ford over the river...
Continuing from last time, a Union force under Brig-Gen Justin Cayce has been ordered to clear the road north in pursuit of a retreating Rebel army.  Approaching the village of Torkville, lying within the confluence of Nesmith Creek and the Dolenz River, they found a Confederate rearguard ready to contest their further advance.
Confederates open fire at long range as the Union troops approach.
The dice are explained in the text.

Advancing straight up the main road, 15th Kentucky was the first to feel the weight of Rebel fire.

(At this point I left the dice on table to illustrate my method of shooting.  As the Kentuckians had moved, they were not able to return fire - not yet. 


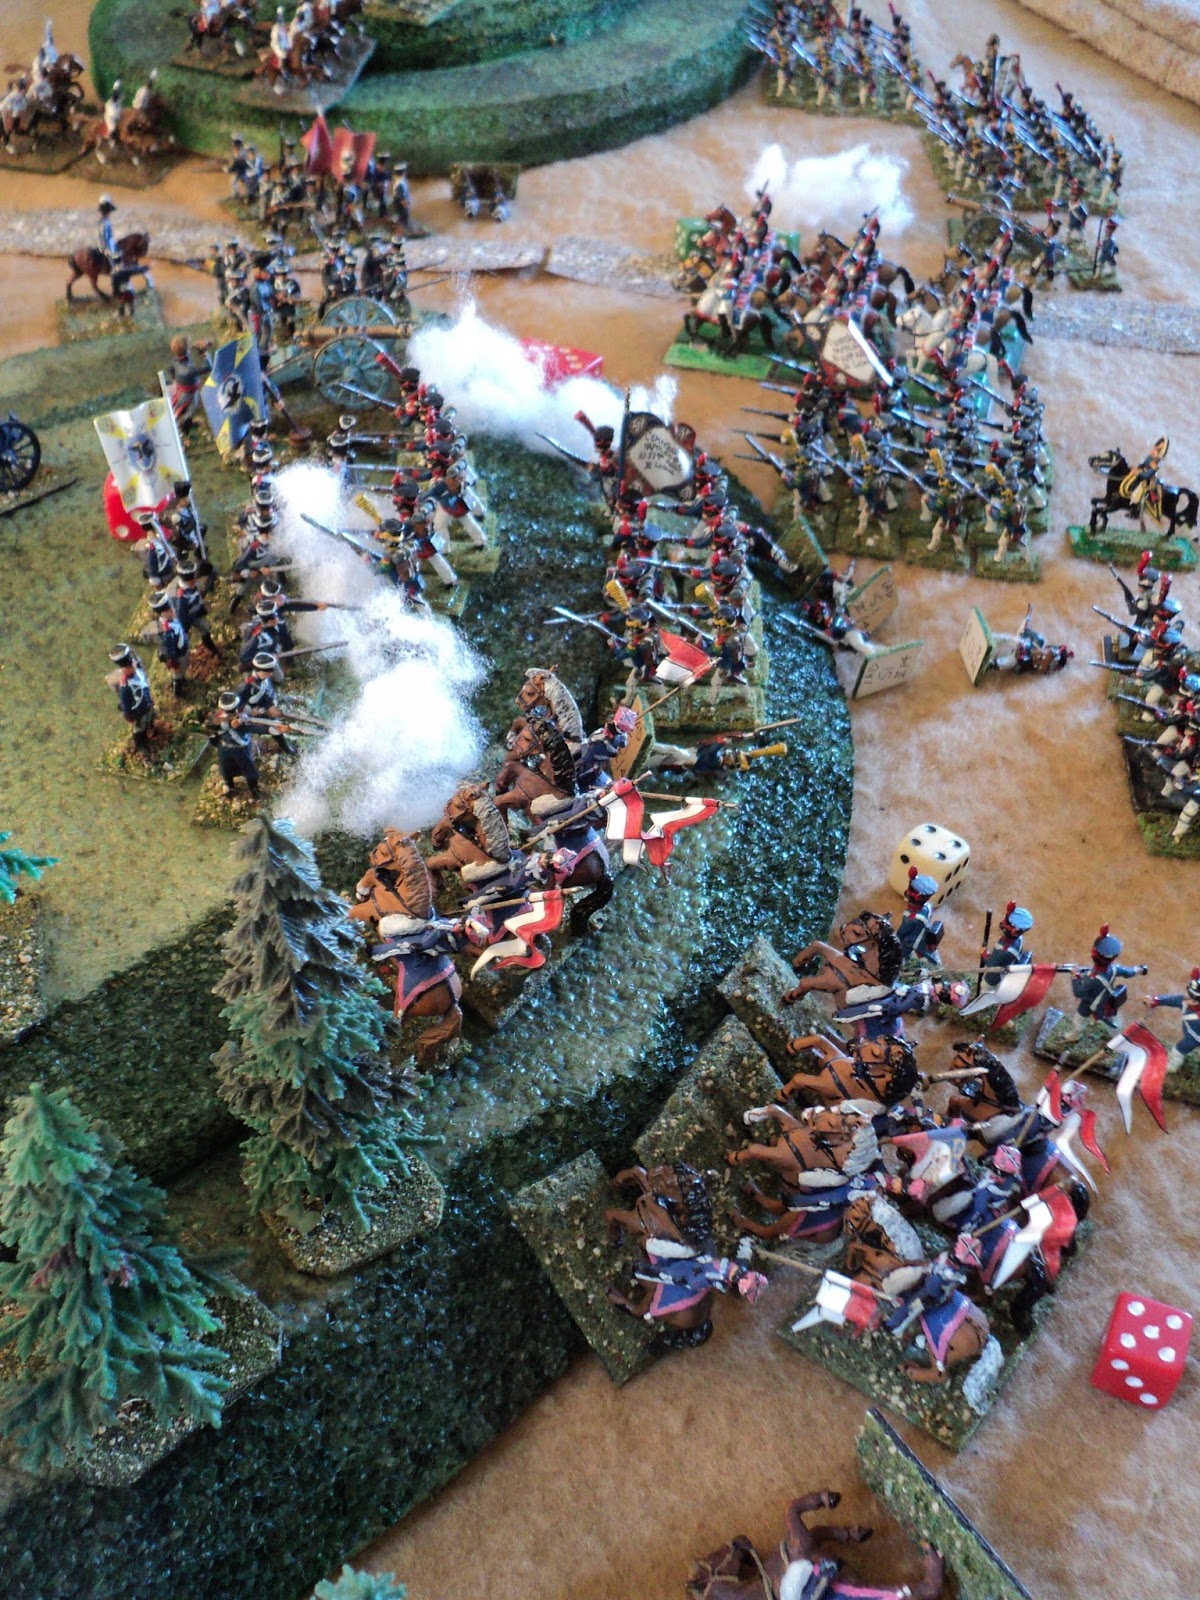
Both 18th S.C. and the Palmetto Battery (12pr Smoothbores) were shooting at the same target, their fire has to be adjudicated together, not severally.  At just beyond canister range, the artillery die range is 4 (DR=4).  Infantry: 4-man volley groups are firing at 'long' range, the 3rd of 4 range bands, so their DR=2.  Die Range defines the maximum dice scores that count; any higher roll is ignored. 

In this case Palmetto Battery scores the maximum: 4.  A 5 or 6 would have missed.  Eighteenth South Carolina rolls 6 dice, with the scores you see in the picture: 1,1,2,5,6,6.  Only the ones and twos count, for a total of 4 hits.  Added to the artillery, this means 8 hits scored on 15th Kentucky. 


Union troops close up to the creek.

This is very good shooting, but 8 hits do not mean 8 casualties.  Instead of saving rolls, I use a method vaguely similar to Charles Grant's from The War Game.  The hits are grouped into eights, plus any remainder.  In this case all 8 hits form one 'hit group'.  As many dice were rolled, as you see in the bottom right of the picture above.  For clarity I have laid the scores out in rows.  Four rows: four casualties.  What we are doing is counting the distinct scores and ignoring duplicates (one poor fellow took three hits).  A group of eight does guarantee there will be duplicates, as the maximum 'casualties' will be 6.  But I chose 8-hit groups (instead of 6-hit) to make 6 casualties from a given 'hit group' more likely, but also to 'smooth out' the 'discontinuity' where there are more than 8 (or 16) hits on a target.


Having taken more than 10% of its 27-figure strength in losses, the morale of 15th Kentucky is called into question.  At this point, no modification is called for, Kentucky just have to beat a roll of '1'. They roll a '4', indicating their morale remained high.  In view of their subsequent performance, they must have been a determined bunch!


Action has become general all along the line.
I will continue the narrative as an action with just occasional diversions into game mechanics.

Advancing into the teeth of heavy Confederate fire, 15th Kentucky were soon giving back as good as they were getting. Battery A/ 10th US Artillery soon joined in. As the remainder of Cayce's troops drew up to the line of Nesmith Creek, the action spread from west to east, and became general all along the line.  Sixth Alabama was quickly drawn out of reserve to support 26th S.C. contesting the east bridge crossing.


Sinister developments on the Confederate left flank, as a
Battery of Napoleon cannon take up an enfilade position.
Outnumbered as they were, the Rebels were feeling the heat badly enough, but sinister developments were taking place, appropriately enough, beyond their left flank, across the creek.  A patrol from 8th US Cavalry had discovered a ford across the Dolenz River, close by the Nesmith Creek branch.  As the Regulars called in their patrols, 27th Pennsylvania Cavalry were despatched post haste to effect a crossing there. Following them marched the 126th New York infantry.  By this time, the Napoleons of 12th Vermont Artillery were unlimbering to enfilade the battle line of 6th Alabama.

15th Kentucky fighting back hard!
Meanwhile, 18th S.C. was not finding 15th Ky so easy to contain, the contest becoming a dire battle of attrition.  In the above picture, both units, already reduced to 4 whole and 1 part volley group, roll 4 dice plus a 'fraction' (for each figure less than 4, the DR is reduced by 1).  The Confederates roll a miserable 1 hit, the Union a very creditable 7!  I don't recall whether at this range the DR was 2 or 3, but given the actual dice rolls it scarcely matters.  At any rate, 1 hit is 1 casualty; 7 hits (the 'part' die roll counted) ... rather more! The South Carolinians are not having things all their own way!
If 18th South Carolina's shooting was dismal in the previous
picture, 66th Ohio's is even worse!  29th Ohio, to their left,
performs rather better...
Although the Palmetto battery was helping all it could, the counter-battery from the rifled guns across the stream was becoming more than a nuisance.  It was not long before the guns had perforce to limver up and make off.  Meanwhile, the shooting by 66th Ohio in the above picture was about as effectual as that of 18th S.C. was being: a mere 1 hit from 6 rolls. (At 'long' range, with DR=2, the Statistical Expectation would be 3 hits. Theoretically you could get as many as 12, but that likelihood is almost vanishingly small: 46,655 to 1 against (gotta have my Mr Spock moment).  Still, you have seen what 15th Kentucky managed with 4 and a bit dice!

In view of the developing menace beyond the Confederate left, Cobb's Legion was ordered to deal with the approaching Union cavalry.  To do so, Lt-Col Scoones split his command in two.  Detailing half his command to dismount and line the south bank of the river, he led the remainder across the bridge.  He hoped that the combination of mounted and dismounted action would throw back the Union horse, and keep the north road open.

Cobb's Legion prepares to deal with the distant Union
cavalry approaching along the north bank.


General Justin Cayce takes a hit!
It was about this juncture that the Union suffered a minor calamity: the wounding of General Cayce. In determining actual losses from hits received, multiple sixes appearing denotes the casualty is an officer i.e. must come from the HQ element.  This can have an effect on command and possibly control.  In this instance, 5 hits were registered on 66th Ohio.  Rolling the 5 gave the scores you see in the picture below: 3 casualties.  Now, a triple six signifies that any general with or within 5cm (2 inches) of the unit becomes a casualty.  So, poor General Cayce is out of the action.  To determine the severity of the wound, I rolled a 3 - moderately severe and incapacitating injury.  For this particular action, this loss had no significance, but it ought (a) to have led to a morale check for 66th Ohio (3 casualties - over 10% - in effect although in fact it lost just 2 figures) and (b) placed all units temporarily 'out of command'.

Cobb's Legion splits in two: 10 figures to face the 15-strong
Pennsylvanians, the remaining 13 figures line the south bank
 preparing for dismounted action.
Under mounting pressure, the bridge defenders began to give back.  26th S.C. soon fell back in confusion, and before 11th Alabama, the reserve unit, could intervene, 66th Ohio was surging across the bridge to form a line beyond.
Supported by musketry from 66th Ohio, 29th Ohio storm
across the east bridge.
The firefight between 6th Alabama and 5th Ohio was decided in favour of the former.  Having lost more than half their strength, the Ohioans fell back in only fairish order (50% loss forced a retreat, and a morale roll.  The morale roll happened to be good, so they retired still in hand, facing the enemy.  They counted as 'used up' and will remained henceforth out of the action). This success was costing 6th Alabama dear.  Finding the galling flank fire from the Union guns firing down the length of their line too much to cope with as well, they faded back, though still under command, into the woods behind them.  Although intending to continue fighting from its cover, they didn't stay there long, and eventually continued their move towards the north bridge.  
Under heavy fire, 66th Ohio form line and establish
 a precarious bridgehead.
Union pressure at the bridges gradually forced the Confederates to relinquish their defensive grip. First, the Palmetto battery, pounded by counter-battery fire from the Union artillery on the opposite bank, had limbered up and made off through the village.  Shortly afterwards they could be seen crossing the north bridge, just behind the cavalry action that was then developing on the north bank.
The depleted Palmetto Artillery retire across the bridge as
27th Pa. Cav. run the gauntlet of carbine fire in its
attempt to clear the road.
Together with the 20pr Parrotts of the Montgomery Artillery, 11th Alabama were holding off 66th Ohio, though both were finding it hard to sustain the mutual mauling (both were having to take morale rolls, which by some miracle both were passing.  The only unit so far to fail its morale had been the 26th S.C. which had since rallied and had been ordered to lead the general withdrawal from the field).
The Confederates have been driven from the banks of the creek.
18th Georgia is holding the village; 26 N.C. is beginning its withdrawal
from the action
Eighteenth S.C. had fallen back to the southern edge of the hamlet, where they hoped to use the cover of its fences and outbuildings to hold the further advance of the Federals up the main road.  It was becoming clear that the whole rearguard position was becoming untenable.  It remained for General Zebedee to bring off his command in good order, whilst continuing to impose a delay upon the assailants.  A great deal depended upon the success of the cavalry action developing close by his escape route across the north bridge.
126th New York crosses the ford.  
The fight for the 29th Ohio's bridgehead.
The Union seems to be making good progress!
Following up the Union cavalry, 126th New York was splashing across the ford and would soon be up with their mounted comrades.  Behind 66th Ohio, the US regular cavalry was making ready to cross the east bridge, and up the main road, 15th Kentucky, still enthusiastic despite its losses so far, were about to storm across the west bridge, and into the village.   
We'll leave the matter there, for now, with the Confederates, in danger of being cut off, under severe pressure everywhere, and having to face fresh US troops about to enter the fray.  Added to that, not half the day had yet elapsed.  Nightfall was still a long, long way off...

To be concluded...

Tuesday, October 27, 2015

Holding Action (2)

At some point I want to post an article, or maybe a series, on campaign ideas that I've been having recently, and some from the distant past that I'm considering revivifying.  But before so doing I wanted to try out my 'conventional' (i.e. 'old school') American Civil War rule set, Bluebellies and Greybacks,  on my small four-foot-four by four-foot table.
An hour or two after daybreak, 27 June 1864.
U.S. Cavalry scouts cover the Union
advance, and seek out alternative crossing points along the river.
 Having already played one 'Holding Action' scenario from the Charles S. Grant 'Green Book' I thought I'd play the other.  The original scenario was designed for the Grant Horse and Musket organisation, that I had to translate into my own army design.  Here the BLUE Force is actually grey: a Confederate force commanded by Brig-Gen Zander Z. Zebedee, charged with delaying a Union push up the road.  Commanding the Union (RED Force) on this occasion was the redoubtable Brig-Genl Justin Cayce, veteran of many a battle. 
Confederates barring the road.  Half the cavalry should really
be behind the woods, but as they have been conflated to a single
unit, I placed them all beside the town.
 The forces, scaled down approximately from the original comprised the following:

Confederate States of America: GoC Z.Z.Zebedee.

6th Alabama Infantry ... 27 figures (HQ element of 3 figures plus 24 other ranks)
11th Alabama Infantry ... 27 figures
18th South Carolina Infantry ... 27 figures
26th South Carolina Infantry ... 27 figures
9th Georgia  Cavalry (Cobb's Legion) ... 23 figures (HQ of 3 plus 20 troopers)
2 batteries of artillery ...8 figures, 2 cannon (1x12pr Napoleon SB, 1x20pr Parrott Rifle)

Totals: 108 foot, 23 horse, 8 gunners: 139 figures plus 2 cannon.
Guns and infantry guard the bridge crossings.

One of these units, the column beside the wood ought to have been 21 figures only, cognate to the 'light infantry' unit called for in the original.  I also reduced the three cannon to two, to maintain a reasonable balance with the other arms.  Finally, the two cavalry units were conflated into the one beside the town, the one behind the woods 'omitted'.

Union troops advance.  The pickets approach the stream.
Surely there must be a practical ford somewhere?

 United states of America: GoC Justin Cayce.

15th Kentucky Infantry ... 27 figures
5th Ohio Infantry ... 27 figures
29th Ohio Infantry ... 27 figures
66th Ohio Infantry ... 27 figures
126th New York Infantry... 27 figures
27th Pennsylvania Cavalry ... 15 figures (3 HQ figures plus 12 troopers)
8th U.S. Cavalry ... 15 figures
3 batteries of artillery... 12 figures, 3 cannon (1x12pr Napoleon SB, 1x10pr Parrott Rifle, 1x3-inch Rodman).

Totals: 135 foot, 30 horse, 12 gunners: 177 figures plus 3 cannon.
Confederate eye view...

Again I considered using a 21-figure Zouave unit in place of the original 'light infantry', but went with a full strength unit instead.  The 3 to 2 ratio of cavalry was roughly maintained, the discrepancy perhaps compensated for by the ratio of cannon being changed from 4:3 to 3:2.  


Battle narrative:  Introduction:

On the morning of 27th June, 1864, the small expeditionary force under Major-General Casimir Praughan, led by Brig-Gen. Justin Cayce's reinforced brigade, came up against a Confederate rearguard that appeared determined at last to resist the Union advance.  For several days, now, the Union troops had been hard upon the heels of General P.T. Armighan's small army.  At last finding bottleneck where two roads converged between the forks of the Shutzedoah River, General Armighan turned over the command of the rearguard to Brig-Gen Zebedee, reinforced his brigade with cavalry and cannon, and marched, with the remainder of his army, on his way.  Zebedee's orders were to hold for a day... if he could.  His prospects seemed promising: neither stream could be crossed but by the bridges.  Had he the wherewithal and the time, he would this minute have men demolishing them. Lacking such means, he placed infantry and guns to cover the bridges with musketry and gunfire, ordered 6th Ala to reinforce the defenders of the eastern bridge, and retained 11th Ala and Cobb's Legion in reserve...

15th Kentucky advancing in the teeth of Confederate resistance.
Gun (SB, long canister range) Die Range 4; rolled a 4 - 4 hits from the gun, then.
18th S.C. (long range musketry)  Die Range 2; score 4 hits.
Total of 8 hits against the one target, resolve as 4 casualties - enough to trigger a
morale check.  15 Ky rolls a 4: morale remains good.
The battle narrative, and comments on the rule set on the size of table, will continue in a further posting.  Before going, though, as the rule set is pretty conventional, the ground scale is 900:1 (one millimetre represents 1 yard), and the time scale 30:1 in keeping with a convention I developed last year (time scale = square root of ground scale).  So 1 turn represents simultaneously 1 minute and half an hour; 24 turns a period of 12 hours.
To be continued... 

Saturday, October 24, 2015

Big Battles for Small Tables: Holding Action

Russian, 1813: Retreat from Smolensk.  French troops (II and VI Corps)
 attempt to break through General Yorck's Prussian Corps barring the
escape to the west.  For the narrative, pray read on...
My apologies to readers for the lengthy hiatus.  What with one thing and another, finding the time and inclination to do much wargamery type stuff  has been problematic of late.  But, to continue...

The following was an extended play test of my Big Battles for Small Tables rule set (I need to come up with a better title by now), in particular the combat aspects, for a reasonably sized action.  For this I chose Scenario 3 from Charles S Grant's 'Green Book' (Scenarios for Wargames),  having recently been inspired to give it a crack by Ross Mac's blog account a couple of months back of an ACW action based on the same idea.

Narrative:

For the rest of his life after the disastrous campaign of 1812, Napoleon allowed that instead of wintering his army in and about Smolensk, he would have had more success bringing Tsar Alexander to the negotiating table had he continued on to Moscow.  The area around about the ancient border city was soon eaten out, though the bulk of La Grande Armee clung on through the entire winter season into 1813.  But with the approaching thaw, the game was up.  Becoming increasingly mutinous, despite the efforts of the Emperor and his Marshals to maintain discipline, the Army was perceptibly fraying at the edges.  A further advance into the Russian vastness being out of the question, retreat remained the only option.

Mid-morning: French troops advancing 'off the march'
 to clear the road westward.  II Corps from the left (south);
Cuirassiers and VI Corps from the right (east).  Prussians
holding the distant ridges bar the way.
From their position about Polotsk, the Corps of Marshal Oudinot (II) and General Gouvion St Cyr (VI) took as they withdrew a route parallel to that of the main Army,  towards Vilna.  Meanwhile, Marshal Macdonald's X Corps had stalled for good about Riga.  Unable to take the place, even after continual bombardment had practically levelled what was left of it after the defenders razed the suburbs, the good Marshal had settled down to wait out the winter.  Eventually learning of Napoleon's decision to pull out of Russia, Macdonald began a leisurely retreat.

Whether he was wise to place Yorck's Prussian Division as rearguard is hard to say.  General Yorck was suborned by smooth-talking Russian envoys (accompanied by the renegade Colonel von Clausewitz) under a flag of truce.  At any event, Macdonald lost contact with Yorck's Division, together with the cavalry, and made off barely with General Grandjean's Division alone.  Outlying Prussian troops joining Yorck's command built up into a respectable Corps of troops.
Prussian 7th (Landwehr) Division, reinforced by artillery
 holding the north flank.
That might have been the end of the Prussian involvement in the Russian debacle, but Russian intelligence indicated that two French Army Corps were approaching from the east.  An urgent request arrived at Yorck's HQ on the evening of March 2 1813 to divert his march eastwards, and hold up the enemy moves near the village of Putinovo.  Two roads converged there from east and south, a single westward road passing between wooded ridges.  At that pass a stand might be made fatally to delay the French retreat...
Prussian 4th Division barring the road, whilst 3rd Division, with
artillery support hold the high ground to their right.  Behind them.
1st (Grenadier) Division and the Heavy cavalry, in reserve,
await developments.
 Accompanied by a Brigade of Cuirassiers, the three Divisions of VI Corps (19th, 20th and 34th) approached the village by the north road; those of II Corps (6th, 8th and 9th) by the southern.  In the early morning light, they found Yorck's small army standing athwart their line of retreat. Uncomfortably close behind the French, an indeterminate but large force of Russians were known to be pressing westward as fast as they could march.  The was no option then: the passage west had to be forced, and forced before the day was out.
Midday: All the French troops are ready to go.  But there isn't much time
left in the day to clear the road westward.
This action took place on a table 4ft (122cm) by 4ft 4in (135cm) - a very small surface for the size of the battle.  The scenario was tailored partly to fit the playing surface, partly to fit my army organizations.  The forces were as follows:

Midday: The French have at last all arrived on the field,
but the Prussian line is not yet under any real pressure.
The clock is ticking!

BLUE FORCE: Prussians, defending:

Commanding, General Yorck

1st Infantry Division (Grenadiers)  24 figures (4800)
3rd Infantry Division 24 figures (4800)
4th Infantry Division 24 figures (4800)
7th Infantry Division (Landwehr) 24 figures (4800)
1st (Heavy) Cavalry Brigade 12 mounted figures (2400)
2 batteries each with 3 crew (representing 1200 gunners and 48 guns overall)

Totals: 96 infantry figures, 12 cavalry and 6 gunners: 114 (22,800).
As the French swarm onto the battlefield, VI Corps artillery
begins to bombard the Prussian 4th Division straddling the road.
French gunnery was to prove quite effective throughout the day.

RED FORCE: French, attacking:

Commanding, Marshal Oudinot

II Corps: Marshal Oudinot

6th Infantry Division (Legrand) 24 figures (4800)
8th infantry Division (Verdier) 24 figures (4800)
9th Infantry Division (Merle) 24 figures (4800)
Light Cavalry Brigade 12 Lancers (2400)
Corps Artillery 1 gun with 4 figures (800 gunners with 32 guns)

VI Corps: General Gouvion St Cyr

19th Infantry Division (Deroy) 24 figures (4800)
20th Infantry Division (Wrede) 24 figures (4800)
34th infantry Division (Morand) 24 figures (4800)
Light Cavalry Brigade 12 Hussars (2400)
Heavy Cavalry Brigade (St Germain, attached) 12 Cuirassiers (2400) (attached)
Corps Artillery 1 gun with 4 figures (800 gunners with 32 guns)

Totals: 144 Infantry figures, 36 Cavalry and 8 gunners: 188 (37,600).

I had to 'massage' the numbers given by the original scenario.  The French got a slightly better ratio of infantry (approximately 13 to 9 increased to 3 to 2) and artillery (2 guns each, but Prussians with 3 crew each instead of 4, representing a ratio of 64 French cannon to 48 Prussian).  These adjustments in French favour came at the price of a heavy cavalry unit (one available, instead of two), and the BLUE (Prussian) horse was upgraded to heavy.  I believe this preserved an approximate balance.

Return fire from the Prussian guns.  In defence they took
a considerable toll of their assailants.
This action was intended to play test some combat mechanics for my large scale battles rule set. I'm still working on it, but trying to keep it simple isn't proving so easy.
II Corps light horse and 6th Division attacking with
artillery support.  Eighth and 9th Divisions hurrying into
the action.  VI Corps artillery pound the 4th Division squares
beside the road, whilst the cuirassiers consider their options.

At the same time, it was interesting to see how my rules for movement worked in the context of my ground and time scales (1:3600 ground scale; 1:60 time scale).  The action was fought across the 4-foot width of the table.

Morand's Division hurries up to support its friends on the right.
The French began the action marching onto the table along the south and east roads leading to the village of Putinovo. It quickly became apparent that it was going to take half the day (6 turns) to bring both Army Corps onto the table, even marching along the roads and arriving by separate routes.  Actually it took 5 turns for II Corps, with the logistic element (supply train) arriving on the 6th.  Sixth Corps was preceded by the Cuirassier Brigade, so took a turn (1 hour) longer.


Close quarter engagement on the Prussian
flank.


This was not going to leave a whole lot of time to clear the passage westward: six turns only to march across the board, bash a way through the defenders and carry on westward. Nor did the French quite make it, though they came very close. To have any chance at all, the French had to attack 'off the march' - no dallying around preparing a set piece attack!


Marshal Oudinot's Corps swung westward, bypassing Putinovo to the south, and made straight for the ridge flanking the west road to the south, and upon which stood the Prussian 3rd Division together with half the available artillery.  The light horse (lancers) paused until the leading infantry Division (6th) together with the Corps artillery park hove alongside.  Then, supported by the guns, horse and foot charged up the slope together, striking at the Prussian right flank end of the line.  Under cover of the close action there,  Verdier's Division column drew alongside and brought the remainder of the Prussian 3rd Division into action.
VI Corps in oblique order.  This was adventitious, not planned!
By this time, St Cyr's infantry were closing in upon the north ridge, where awaited the 7th (Landwehr) Division with the remainder of the Prussian artillery.  Deroy's Division led, the the other two echeloned back to the left.  The oblique order form of attack was due solely to St Cyr's haste, rather than any thought out plan.
Prussian 3rd Division begins to buckle under the pressure.

The Prussians have been edged off the high ground
 south of the road, though the supporting artillery
 continue to defy the French.
By mid-afternoon, the Prussians defending the south ridge were feeling the weight of the entire II Corps bearing down upon them.  The right of the line shattered and fell back in rout; the artillery, together with what remained of 3rd Division held a short while longer.  Then they too were driven off the hill into the plain beyond.

It was at this point that events developed in the centre.  In an effort to reduce the pressure against 7th (Landwehr) Division, the counterattack by Prussian heavy cavalry struck the column of Morand's (34th) Division before the latter could form square.  In the combat that followed, it was hard to tell whether the mechanics were appropriate, as the cavalry scored rather higher and the infantry much lower than anticipated. There was no question about it: the French infantry were defeated and flung back.  The Prussian horse reined in and withdraw triumphantly behind their infantry.


At the same time, the French cuirassiers attacked the brigade squares of 4th Prussian Division in the hope that a quick success there would be decisive. The effort failed badly: the 12 heavy cavalry figures scoring one hit and taking three against the 8 enemy foot.
Morand's Division takes a knock from Prussian heavies.
Prussians lose 2 figures; the French 5. Victory for the
Prussians!

These setbacks did nothing to speed the French towards achieving their objective of clearing the road westward.  The VI Corps artillery resumed its effective bombardment against the Prussians covering the road, but otherwise, it was up to the infantry to loosen the Prussian hold by clearing the high ground.


Heavy French casualties as they struggle up the slopes in the
teeth of fierce resistance.
Legrand's Division makes way for Merle's for the final push.
Guarding the road awaits the Prussian 1st (Grenadier)
Division.
The southern ridge in French hands, the Prussian 1st (Grenadier) Division swung right to face the enemy surging over that eminence.  Risking the loss of time, Legrand's Division drew aside to allow Merle's fresh troops to pass through.

Close action on the French right....
As the Prussian cavalry had to rally from their counterattack, 7th (Landwehr) had to face two French Divisions unaided but for the supporting guns.  First the left flank collapsed, whereat the VI Corps light horse (hussars) flooded through the gap.  As the sun sank towards the western horizon, the remainder of 7th Division had perforce to abandon the high ground as well.  The survivors streamed off down the road.
... With the collapse of the Landwehr left flank, Deroy makes
way for the VI Corps light horse to exploit the breach.
General view of the action, with dusk drawing in,
looking south to north.

By now it was clear that the Prussian hold on the pass was no longer tenable.  It remained, however, to dislodge them from their position astride the road.  Facing II Corps swarming over the south ridge, the Prussian Grenadiers found themselves with the dilemma of staying in line to try and halt the French cavalry, or forming square in the face of French division columns.  Hoping that their firepower would be enough to contain the light horse, the Prussian chose the former.  In the gathering dusk, the lancers threw themselves upon the Prussian line.  As they closed, the Prussian muskets emptied a number of saddles, but this served merely to enrage rather than dismay.  With lance, sabre and pistol, the horsemen exacted a savage vengeance.  The Grenadiers perforce joined the general retreat into the sunset.

The south ridge cleared, it remains to brush aside the Grenadiers
and carry on westward.  But the day is almost done...
That was the final action of the day.  In the fading light, the remnants of General Yorck's command made off into the darkness.  But although the pass was now safely in French hands, it was too late for them to resume their march.  Both sides, therefore, had grounds for self-congratulation.  The Prussian holding action had cost the French more than half a day's march (A wargames foot unit can march 10 foot [representing 6 2/3 miles]on a road.  The width of the table was just 4 foot.  So the fight cost the French 6 foot [4 miles] of march) I'll come back to this parenthetical remark.
Resistance of the Prussian 7th (Landwehr) Division collapses
with the fading light.
It was interesting to survey the damage, here - the 'butcher's bill'.  The Prussians lost some 43 figures overall, including 2 cavalry and 4 artillerymen.  These last might well represent the loss of the representative number of cannon: 32 out of 48.  French casualties were heavy enough in storming the pass: 38 figures. of which five were cavalry, the rest foot. I mention these less for the record than to confirm that in the course of the action the casualty rate remained within the realms of plausibility.
The last action of the day as the II Corps light horse charge the
Prussian Grenadiers.   In the face of rapidly approaching
 infantry columns, the Grenadiers had to face the charge
in lime formation.  It did not go well for them... 
Prussian Landwehr attacked by the Divisions of  Deroy and Wrede.
Deroy is already closely engaged; Wrede hurrying up in support.
A number of issues arose in the course of this action.

1. Time.  I begin to think that a slight increase in movement rates might not after all go amiss: say 2" (5cm) across the board.  This would revert to the movement rates I began with, but that seemed a little on the generous side at the time.  It seems to me that a less than seven miles per day march rate can reasonably be improved upon.  

2. The combat mechanics will need considerable refinement.  What struck me as a simple scheme is proving less than simple in the fine tuning.

3. Morale.  For the sake of simplicity, morale was reduced to two simple mechanics: losses exceeding 50% and the outcome of close combat.  The latter was compromised somewhat by the basing of the Prussian formations.  I may add some refinement, but so far this 'working system' will do - at least for now.

4. The Prussian were given to me as an alternative to their being deep-sixed (which I thought an undeserved fate).  However, most had been mounted 2x2 on 3cmx4cm bases.  This doesn't fit at all with my planned scheme of Divisions drawn up in two single rank lines with a gap of, say, 2cm between them.  I planned to treat the double-rank bases as though they were successive lines, but forgot when it came to the crunch - at least in terms of what happened as a result of the close combats.  The Prussian lines ought to have fallen back as it were onto a supporting line (a 2cm recoil).  This would have delayed the French more, but also led to heavier losses to Prussia.

Never mind: it was certainly an exciting enough action, with plenty happening.  A promising project!